The first week of the new year, I had some downtime from waiting for stuff for my scanlation project. That’s when I decided to start up this game project again. I was also freshly inspired from playing some games on the PS5. I added improvements to the parkour mechanics like a separate vertical wall run, being able to control the wall jump angle, and a small climb up vault. A new video was posted on the subreddit which was a hit on that weekend again.
The inspiration for the 3D Maneuver Gear mechanic was from Trigun too. The Wirebug being involved in Monster Hunter Rise’s combat loop was also influential. But if we’re talking about omni-directional movement, it was Attack On Titan that popularized this fantastical movement style. I looked up other examples of devs trying to implement it on Youtube. Then I also went back to the source, to the original and infamous Attack on Titan Tribute Game. The controls on that game were quite complicated, which added to its mastery aspect. Even including separate buttons for reeling the wires. It became one of my goals to simplify them since I was designing gamepad controls.
I took on the challenge of the 3DM gear because it would push my understanding of the forces for my new player controller. My starting point was spring physics between the player and a point. After that it was about understanding the directional boosting mechanic and how to control it intuitively. Again, it was an exercise in quaternions and vectors. I came up with novel solution that translated input into centrifugal forces. It was successful at emulating the feel from the AoTTG. Especially the technique of orbiting around an anchor point with the boost input held.
The reddit post for the gameplay video was my most upvoted one. It hit the mark of looking satisfying from watching it alone. It also reminded people of the goo Spider-man web-swinging games. Though, I’m still not sure if the entire free-targeting part will be kept moving forward, since the direction of the game has smaller spaces now. But I really still want to keep it as a combat trick.
Bubblegum Crisis was my gateway to cyberpunk anime, mechs, and the 80’s aesthetic. Tokyo 2040 was a weekly show on local tv back in the day. This time I decided to watch the original OVA series. I couldn’t stop taking screenshots. It was timeless and beautiful. I wanted to make scene studies from it, setting up the camera and geometry to fit as closely. I was also really interested in the painted neon backgrounds and I tried to recreate those too. Filtetring the textures with Img2Pixel kind of worked too, I’ll go back to exploring that look for assets later.
For the next two weeks I was kind of obsessed with studying more Shader tech. First, every indie dev needs their perfect Toon Shader. Zelda-style and all that. I had to nail that deep shadows look too for the retro anime style too. Additionally I tweaked it a lot for blending the right amounts of cell shading and rim lights.
Diving into more indie dev shaders, I also researched everything that made the fabled “PSX” look. From Vertex Wobbling, posterized colors, limited resolutions, and the CRT scanline filters. I made a sub-shadergraph to handle vertex manipulation, and a URP render feature for fullscreen effects.
Dithering as a Postprocessing effect was a difficult topic to get into. The first steps of learning it involved some raw HLSL code and used matrices to create the dither pattern. There was also bits of UV manipulation and modular pixel counting. I eventually got it working to a point where I could make a subgraph to insert into other shaders. But that was only a piece of the puzzle.
What I really wanted to make was a Dynamic Pixelated Skybox Shader. I started by delving into Unity’s Default Skybox shader. I found out it uses some real physics algorithm called Rayleigh and Mie Scattering. I had the intention of learning it but that fell through from all the complicated math involved for very little payoff. I settled for just using blended gradients set colors I picked, where I actually had more control over the final result. Integrating the full screen Bayer Dithering with the skybox was troublesome. I couldn’t get the UV coordinates to match at first. I even tried to pre-render the texture for the skybox into a cubemab from another scene using reflection probes. That was a very roundabout method that I didn’t go with in the end. I found some algorithm that converted View UVs to Cubemap UVs and that sort of worked, to an extent. I could add that to the gradient-based sky but it only looked nice for small pixelation values.
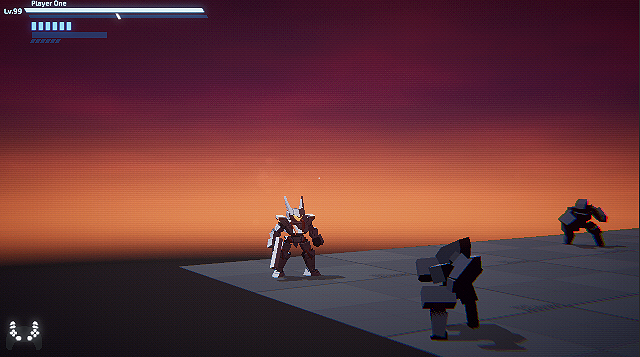
After finally getting that Skybox shader finalized, I went back to my Bubblegum Crisis screenshots and recreated some of its iconic sky gradients. I made a bunch of different ones, and also made some multi-color lighting presets to match them. They ended up looking really nice and could be used for different settings. Another small addition to the shader were some subtle clouds to mix up the textures. Those also showed off the pixelation even more. Combined with the CRT scanlines, the results were amazing.
UV Unwrapping was the other daunting task I had to learn in the 3D art toolset. I tried in Blender before, but using the automated default tools blindly didn’t produce good results. The unwrapping process is just a tedious list of tasks that needed to be done before the painting step begins. From using correct projections, marking seams, reducing stretch, organizing islands; all these had to be checked off for each part of the mesh. This time I found some tutorials and free extensions that helped a bit. An extra step I also had to do was aligning to pixels since I was going for the combined low poly and pixel art style.
I had a tough time accepting that the UV unwrap was very volatile. Editing the mesh would ruin the islands and I’d have to do it again. And if I had already painted on it, I would have to redo that too. It was my programmer brain conflicting with my artist brain. I want things to be reusable. But in art, the finished work is often expendable. You just have to get good enough to do it again, but better. You should build off from the experience of creating something previously.
After the unwrap, Texture Painting in Blender went smoother. I had a quick crash course on pixel art and I discovered lospec.com and its cool color palettes. Being able to import them to Blender was also a nice feature. I gathered a huge pinterest board of mech references. My favorites being the Lego MOCs which I found to fit the aesthetic I was going for. I kept a lot of them for the future too. In the end I even used some more advanced techniques like a secondary emission map, overlapping similar meshes, and changing indexed colors in Photoshop.
